Fellow coffee burr grinder shopping usually comes down to one honest question: are you building your mornings around espresso, or around filter coffee? Once you answer that, the rest (burr style, settings, workflow) gets a lot less confusing—and your cups get more consistent faster.
What if the “best” Fellow grinder isn’t about burr size or price—it’s about how fast you can get from sleepy to a clean counter and a tasty cup? If you drink espresso sometimes, the wrong grinder turns every morning into a science project. If you drink filter coffee always, an espresso-focused grinder can quietly dull flavor clarity. Here’s the no-regrets way to pick Opus vs Ode Gen 2—and a simple routine to keep either one dialed.
TL;DR — The fast, no-regrets pick:
- Fellow Opus grinder: best if espresso is truly part of your routine.
- Fellow Ode grinder (Ode Gen 2): best if filter coffee is your everyday default.
- Best Fellow grinder: the one matched to what you brew most days.
- Light roasts: Ode Gen 2 often reads cleaner and brighter.
- Milk drinks: Opus’s comfort-forward body can be a better match.
- Counter mess: routine beats specs—fix the step where mess happens.
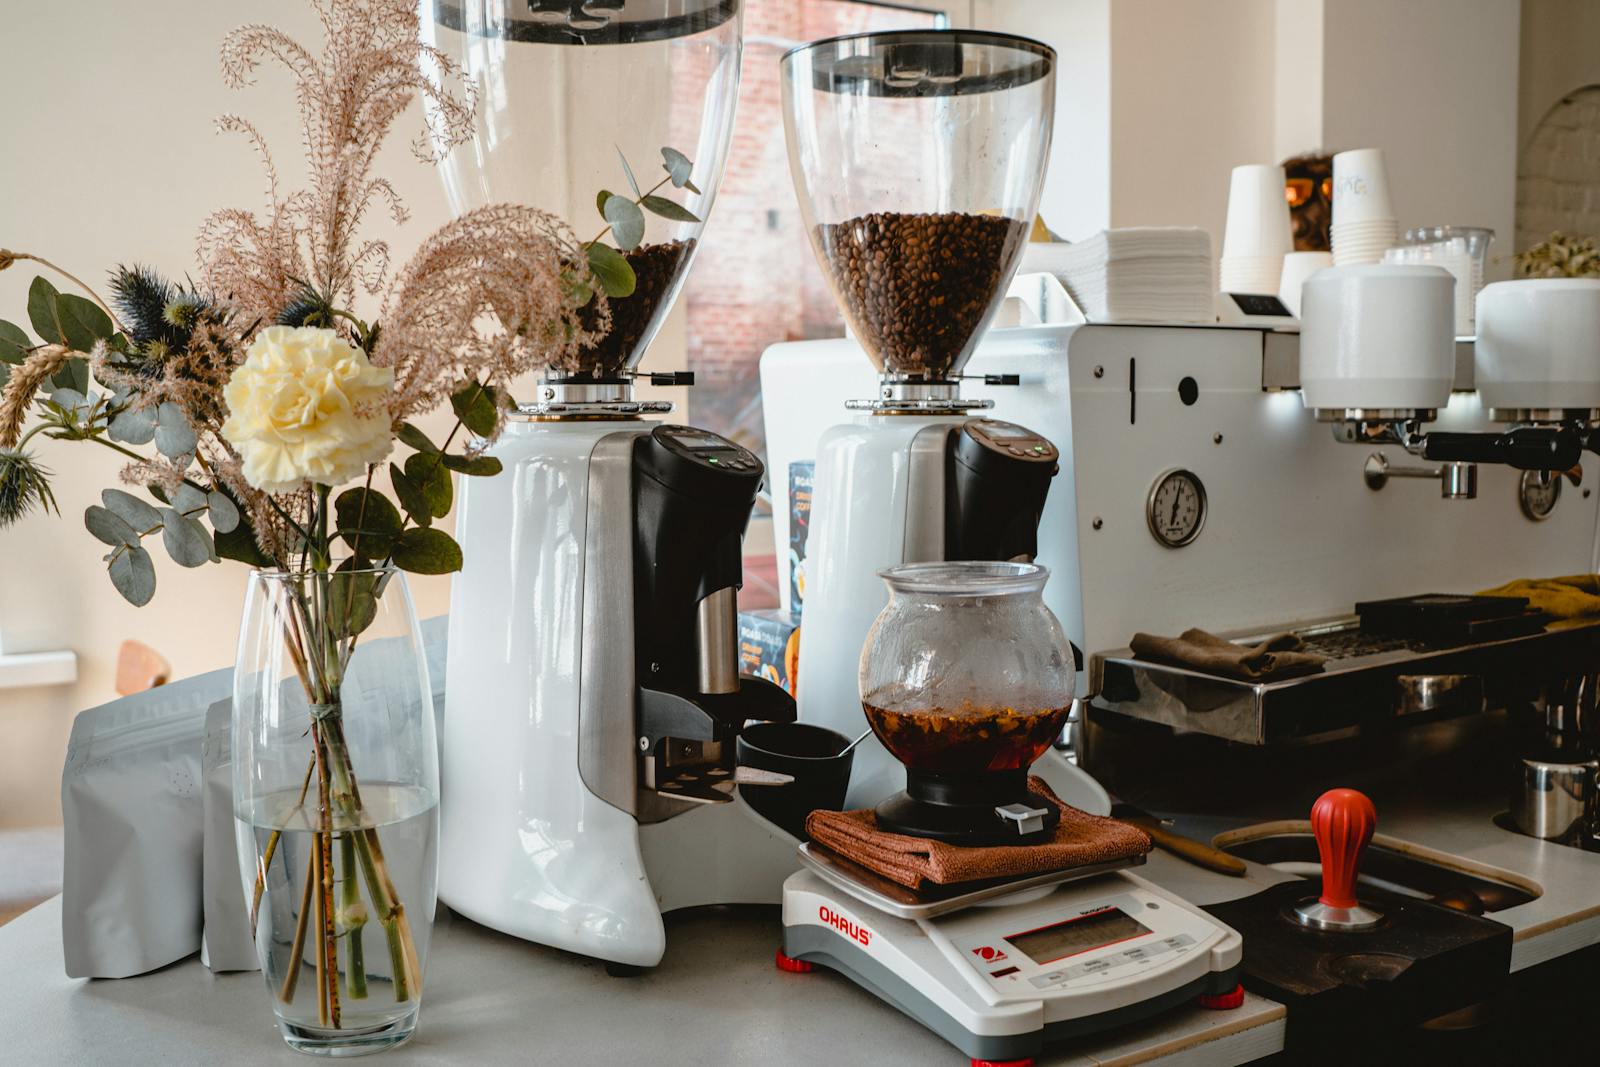
Choose the right Fellow burr grinder
Your best grinder is the one that matches what you brew most days—not what you wish you brewed. If you’re comparing Opus vs Ode, start with brew method: Opus is the “espresso-in-the-picture” option; Ode Gen 2 is the “filter-first” option.
Quick self-check: Will you pull espresso at least weekly for the next 3 months? If yes, lean Opus. If no—and your joy is pour-over, drip, or French press—lean Ode Gen 2. Buying “just in case” espresso is the most common way people end up with the wrong coffee grinder machine for their daily coffee.
Also worth deciding up front: do you want an electric burr coffee grinder you keep on the counter, or are you actually shopping for something else—like a manual coffee grinder, a travel coffee grinder, or a portable electric coffee grinder for trips? Those can be great, but they’re a different category than the Fellow burr grinder lineup this guide focuses on.
Choose Opus when espresso is in the picture
If you’ll pull espresso on a semi-regular basis (even “weekends only”), Opus is the safer pick because it’s designed to reach espresso fineness while still covering drip, pour-over, AeroPress, and French press. The spec sheet matters here: it’s built around a conical burr set and a wide grind range intended for multiple brew styles—exact details live on Fellow’s Opus grinder specs.
Shoppers sometimes search for “Fellow Opus Gen 2” when they’re really looking for the newest Opus listings or a later production run. The practical move is to confirm you’re buying the current Fellow Opus model, then judge it by brew needs (espresso vs filter), not by unofficial naming.
Think of Opus as the “one grinder household” option. A common scenario: you drink cappuccinos on weekends, your partner drinks drip on weekdays, and you don’t want two coffee mills on the counter. Opus is designed to make that shared routine possible without constantly feeling like you picked the wrong tool.
Reviewers tend to frame Opus as a value-friendly espresso-capable choice, especially for homes that want one device to do a lot without getting fussy. WIRED’s take on the day-to-day experience aligns with that “one grinder household” idea in their WIRED Opus review.
Choose Ode Gen 2 when filter coffee is the main event
If you brew pour-over, drip, batch brew, AeroPress (filter-style), or French press most of the time, Ode Gen 2 is purpose-built for that lane—especially if you care about clarity and a clean finish in the cup. Fellow positions it as a brew-focused burr grinder with flat burrs and stepped adjustments, and the key feature claims are summarized on the Ode Gen 2 features page.
If you’re seeing listings for Fellow Ode Gen 1 vs Fellow Ode Gen 2, treat it like buying two different “generations” of the same idea: confirm the version, confirm the burr set, and confirm return/warranty terms. And if a retailer labels something as Fellow Ode Gen 3, don’t assume it’s automatically better—compare the actual burrs, adjustment range, and support you’re getting.
In longer daily-use testing, Serious Eats emphasized usability details (how it feels to live with, not just how it looks on a counter) and the practical performance you can expect from a brew-focused grinder in their four-month grinder test.
Compare the two in 60 seconds
| Decision point | Opus | Ode Gen 2 |
|---|---|---|
| Best for | Espresso + filter in one home | Filter-first (pour-over/drip/French press) |
| Burr style | Conical (often more body) | Flat (often more clarity) |
| Adjustment feel | Wide range + fine tuning options | Simple filter-range steps |
| Daily “effort” | Moderate (espresso habits add steps) | Low (filter dialing is forgiving) |
| If you want “by weight” grinding | Use a scale; no built-in grinder scale | Use a scale; no built-in grinder scale |
| Common regret | Expecting café-level espresso with no learning | Buying it “just in case” for espresso |
Buying and pricing notes (U.S.): if you’re Googling “Fellow Opus price” or “Fellow Ode Gen 2 price,” the exact number changes with promos, bundles, and seasonality. For “Fellow Opus buy USA” shoppers, compare the official store vs marketplaces like Fellow Ode Gen 2 Amazon listings based on returns, warranty support, and shipping speed. Watch for perks like Fellow free shipping, a Fellow coffee discount code, or a Fellow Ode Gen 2 sale—but prioritize the retailer with the clearest return policy over a slightly lower price.
Finishes and fit matter too: if you care about aesthetics, you’ll see people search “Fellow Opus matte black” or “black coffee grinder” vs “white coffee grinder.” Colorways can vary by retailer and region, so verify the listing details. If you’re buying outside the U.S., also confirm voltage (110v vs 220v coffee grinder versions) before you click “buy.”
One more boundary: if you’re actually shopping for a grind and brew coffee maker, a coffee maker with grinder, or a single serve coffee maker with grinder, that’s a different product class than a standalone burr grinder. You’ll want to compare those as “coffee grinder and brewer” systems instead of trying to shoehorn this Opus vs Ode decision into it.
Burrs and flavor: what changes in the cup
If two grinders are both “good,” the difference you’ll notice most is clarity vs. body—not a magic jump in strength. Burr design doesn’t create flavor out of thin air; it changes how evenly the coffee extracts, which changes how cleanly you taste what the beans already have.
Conical vs. flat burrs in plain English
Conical burrs (Opus’s lane) often feel a little more forgiving: you can land on a tasty cup even if you’re not measuring everything perfectly. Many people describe the result as a touch more body or “roundness,” which can be especially satisfying in milk drinks and comfort-forward roasts. That’s why “conical burr grinder for espresso” searches are so common—body can be a feature.
Flat burrs (Ode Gen 2’s lane) are commonly associated with more clarity—the kind where citrus, berry, or florals feel easier to pick out. If you’re browsing “flat burr grinder” options for filter, this is the appeal. Just know the flip side: clarity can also reveal mistakes. If your pour-over tastes sharp or hollow, a cleaner grinder won’t hide it; it’ll point a spotlight at it.
Translation: Opus makes “good enough” easier; Ode Gen 2 makes “really dialed” more obvious.
Why burr size matters (without the hype)
Bigger burrs can mean faster grinding and, sometimes, more consistent particle distribution. But the “better” part only shows up if the rest of your workflow is stable: consistent dose, consistent brew ratio, consistent water temperature, and a repeatable pouring pattern. If those aren’t stable yet, you’ll get a bigger win from tightening your routine than from chasing specs like “64mm flat burr grinder.”
It also helps to separate burr grinders from the alternatives. A blade coffee grinder can be fine for spices, but it tends to produce a wider mix of particle sizes that makes coffee harder to dial. A burr mill coffee grinder (electric or manual) is typically the right tool if you want repeatable espresso, pour-over, or drip at home.
Match the grinder to your roast style
Here’s a practical pairing that tends to hold up:
- Light roast filter: Ode Gen 2 often highlights fruit and florals.
- Medium roast filter: either works—pick based on clarity (Ode) vs body (Opus).
- Dark roast espresso: Opus often feels easier to dial for chocolate-forward shots.
- Milk drinks: body matters; Opus is a natural fit.
- Black coffee focus: clarity matters; Ode Gen 2 shines.
- Mixed household: decide by the “most brewed” drink, not the rare treat.
If you want a more granular feature-by-feature discussion (including burr behavior and what changes in the cup), Coffeeness’ deep dive is one of the more recent rundowns in an updated Ode overview.
Grind range and settings you’ll actually use
Treat grind settings like “zones,” not sacred numbers—you’re steering taste, not aiming for a single perfect click. Whether you call it a coffee bean grinder, coffee grinder for coffee beans, or a coffee mill, the goal is the same: repeatable particles so you can repeat your cup.
Start with brew-method zones
Instead of hunting for someone else’s exact number, start with a window that matches the brew method and your goal. Then keep everything else the same for two brews while you adjust grind:
- Espresso: fine enough that the shot doesn’t gush; aim for a stable flow you can repeat.
- AeroPress: medium-fine for brighter cups; medium for fuller cups.
- Pour-over: medium to medium-coarse, depending on dripper and pour style.
- Drip coffee: medium; go slightly coarser if your brew tastes bitter.
- French press: coarse enough to reduce sludge; tighten slightly if it tastes weak.
- Cold brew: coarse, but not boulders—aim for even chunks, not dust + rocks.
Moka pot and percolator note: if you’re searching “best coffee grinder for moka pot” or “coffee grinder for percolator,” start in the middle between drip and espresso. Too fine can choke flow and taste harsh; too coarse can taste hollow. The goal is steady flow and balanced sweetness, not maximum strength.
A simple 3-brew dial-in example: Brew #1 tastes sour and thin → go a touch finer. Brew #2 tastes better but still sharp → go a touch finer again (or slow your pour). Brew #3 tastes balanced → stop adjusting and write it down. The win isn’t perfection; it’s landing on a result you can repeat tomorrow.
Dialing espresso on Opus (a repeatable loop)
Here’s a simple three-step loop that keeps you from spiraling:
- Baseline: pick one dose and one yield and keep them fixed for the first week (example: 18g in, ~36g out).
- Time check: if your shot runs too fast and tastes thin, go finer. If it runs too slow and tastes harsh/dry, go coarser.
- Taste check: once time is “in the ballpark,” adjust grind in small steps for flavor (sour → finer; bitter → coarser).
Most people get stuck because they change two things at once (grind and dose, or grind and yield). If you only change one variable per shot, your results become predictable fast. That’s a big part of what people mean when they search “best single dose grinder”: not just single dosing, but single-variable adjustment.
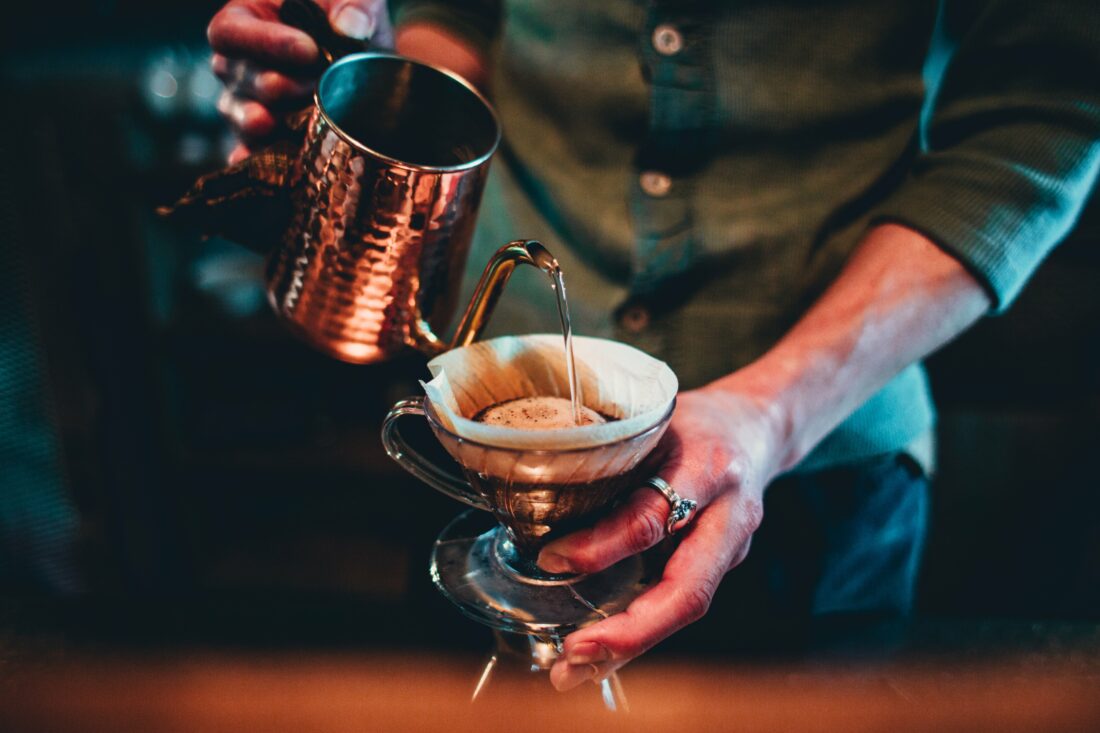
Dialing pour-over on Ode Gen 2 (taste-first adjustments)
Pour-over is more forgiving than espresso, so the winning move is to adjust based on the cup, not the clock. Use this quick mapping:
- Sour/underdeveloped: go a touch finer and/or slow your pour.
- Bitter/dry: go a touch coarser and/or pour faster.
- Muddy/flat: coarser plus gentler agitation (less swirling).
- Watery: slightly finer or increase coffee dose.
- Harsh finish: coarser and reduce steep time (if immersion-style).
- Great aroma, dull taste: check water quality before blaming the grinder.
Printable dial-in log (worksheet) — click into cells and type. This is intentionally simple and works great as a “one-page habit.” Mobile note: tap a cell, then use your keyboard. To print, use your browser’s print command or the button below.
| Date | Brew method | Dose | Grind setting (zone) | Time | Taste notes | Next change |
|---|---|---|---|---|---|---|
Daily workflow: mess, static, and retention
The cleanest grinder is the one paired with a tiny, repeatable routine. Most “mess problems” aren’t really brand problems—they’re workflow problems: how you add beans, how you start/stop, and how you move grounds into your brewer.
Static control that’s worth doing
If you’re seeing grounds cling to the catch cup or puff onto the counter, don’t jump straight to accessories. Try the minimum-effective steps first:
- Bean prep: add a tiny droplet of water to the beans (a damp spoon handle is enough) before grinding.
- Cup handling: tap the cup once on the counter before you remove it, then pour slowly.
- Pour control: pour close to the basket and don’t “shake” grounds off the cup lip.
- Wipe habit: keep a small dry cloth nearby and wipe the cup lip after every couple of uses.
Single dosing without slowing down
Single dosing doesn’t have to feel precious. The goal is speed and consistency: weigh beans, grind, and move on. A fast routine looks like this: weigh once, grind once, tap once, brew. If you’re brushing out the chute every morning, you’ve turned a helpful habit into a hobby.
If you’re building a “coffee grinder kit” on your counter, keep it minimal: a small scale, a catch cup, and one brush. That’s usually enough to feel tidy. If you’re browsing Fellow Ode accessories, look for anything that makes your routine faster (not fussier), and keep one Fellow cleaning brush-style brush handy so grounds don’t build up around the exit.
Noise and morning-friendliness
Grinders make noise—what you can control is vibration. Put the grinder on a thin rubber mat or folded dish towel, keep it away from the counter edge, and don’t let the catch cup rattle against metal. Those small contact points often matter more than the motor sound itself.
A quick “mess audit”: if your counter gets dirty, note when it happens. Is it when you remove the cup? When you pour? When you knock the brewer? Fix the step, not the grinder.
A quick “retention reality check”: some grounds will always remain inside. The goal isn’t perfection—it’s consistency. If yesterday and today behave the same, you can dial-in reliably, even if retention isn’t “zero.”
Fast win: keep one small tray or mat under your grinder. When a few grounds escape, cleanup becomes a one-swipe reset instead of a full counter scrub.
Calibration and troubleshooting
Troubleshooting goes faster when you change one thing, test once, and write it down. When a grinder “acts weird,” it’s usually one of three issues: a blocked path, a mismatch between grind and brew method, or a routine that’s unintentionally inconsistent.
Zero-point thinking (without obsessing)
You don’t need to chase the exact “true zero” to make great coffee. What you need is a stable reference: if your usual pour-over tastes right at your usual setting, keep it. Only worry about calibration if you can’t reach a reasonable range (too coarse even at the finest, or too fine even at the coarsest) for your brew style.
When to use Opus’s fine tuning (and when not to)
Fine tuning is for narrow problems—like an espresso shot that’s almost there but needs a tiny adjustment. It’s not for “my coffee tastes bad today.” If your cup is suddenly off, check beans (new bag?), water (different filter?), and dose (different scoop?) before you touch any deeper adjustment.
Fix stalls, clogs, and inconsistent output
If grinding slows down, stalls, or sounds strained, stop and simplify your diagnosis:
- Bean check: very oily dark roasts can clump and stick—try a slightly coarser setting and smaller batches.
- Feed check: don’t overfill; let beans feed smoothly instead of forcing a jam.
- Path check: if grounds pack into the exit, a quick clean usually restores normal flow.
- Expectation check: if your brew stalls, it’s often “too fine for this method,” not a broken grinder.
Advanced notes: quick diagnostics that save time
If espresso channels: don’t assume “finer” is the fix. Check distribution first (even puck prep beats finer grind), then adjust in small steps.
If pour-over stalls: it’s often fines + agitation. Go slightly coarser and reduce swirling/stirring before you change your entire recipe.
If the cup swings day to day: measure dose for a week. “Eyeballing” is the #1 hidden variable in home setups.
Safety note: If you’re opening panels or removing burrs, unplug the grinder first and keep water away from the motor area.
Cleaning and maintenance that preserves flavor
If your coffee tastes “stale” after a few weeks, it’s often old oils in the grind path—not your beans. The good news: you don’t need a deep teardown every time. You need a light routine you’ll actually keep.
Weekly clean in five minutes
- Brush: sweep the catch cup and visible exit area.
- Wipe: clean the cup lip and any ledges where grounds collect.
- Run-out: grind a small pinch of beans to clear the path after a messy dose.
Deep clean checklist (monthly/quarterly)
- Unplug: always before opening anything.
- Disassemble: remove accessible parts per your manual.
- Brush thoroughly: focus on burr teeth and the grind chamber walls.
- Reassemble carefully: don’t overtighten; confirm parts seat correctly.
Burrs and upgrades, explained simply: both grinders use steel burrs, and you’ll see people discuss burrs and aftermarket options. With Ode, that sometimes includes searches for Fellow Ode SSP burrs (including burr styles like SSP MP) as a way to chase a specific flavor profile. Treat burr upgrades as optional: they only pay off once your baseline recipe is consistent, and you should confirm compatibility and warranty implications before swapping parts.
Flavor tip: if you switch from a dark, oily espresso roast to a light filter roast, do a quick clean first. Old oils can “ghost” into delicate coffees and make them taste muted—even when everything else is dialed.
Longevity tip: treat the grinder like a precision tool, not a spice mill. Keep it dry, avoid rinsing parts that shouldn’t be wet, and store beans away from heat so you’re not feeding extra oil and dust into the burrs.
FAQ
Most “should I buy it?” questions are really “how often will I use it?” questions. Here are the quick answers people usually need before checking out.
Is the Fellow Opus good for espresso?
Yes—especially if your goal is a capable home espresso grinder that can also handle pour-over and drip without owning two grinders. The key is using a repeatable loop: keep dose and yield steady, adjust grind in small steps, and change one variable at a time. If you want an espresso grinder with scale or “coffee grinder by weight” automation, you’ll need a different category of grinder; Opus is designed to be paired with a separate scale.
Fellow Ode Gen 2 vs DF54: what should you compare?
Compare (1) your brew priority (filter vs espresso), (2) adjustment range and repeatability, (3) workflow mess and retention behavior, and (4) support/returns. Ode Gen 2 is commonly treated as filter-first; if you’re trying to force it into “Fellow Ode for espresso” use, you’ll usually be happier choosing a grinder designed for espresso. If your search includes “Fellow Ode Gen 2 release date,” focus less on the date and more on the actual version you’re buying (Gen 1 vs Gen 2 labeling) and the burr set in the listing.
How do I cut static and mess fast?
Use the minimum-effective combo: a tiny droplet of water on the beans, one gentle tap of the cup before removing it, and a slower pour from cup to brewer. That trio usually beats buying gadgets—and it takes less than 10 seconds once it becomes habit.