If your coffee tastes amazing one day and flat the next, it’s usually not the beans—it’s the measuring. A repeatable coffee-to-water ratio fixes that fast, and a coffee to water ratio calculator keeps the math painless.
What if the “coffee golden ratio” isn’t golden for you? Your grinder, roast level, and even your mug size change how that cup lands. This brewing calculator gives you grams in seconds, shows what to tweak when the cup is bitter or thin, and helps you save your best recipe so you can repeat it tomorrow—on purpose.
Start-here cheat sheet
- Drip coffee ratio: 1:16 (balanced)
- Pour over coffee ratio (V60): 1:16 (start here)
- Moccamaster coffee ratio: 1:16 (easy default)
- French press coffee ratio: 1:15 (heavier body)
- Cold brew concentrate ratio: 1:8 (dilute to taste)
Strength slider (same method)
- Mild: 1:17 (lighter)
- Balanced: 1:16 (classic)
- Bold: 1:15 (stronger)
- Extra light: 1:20 (very mild)
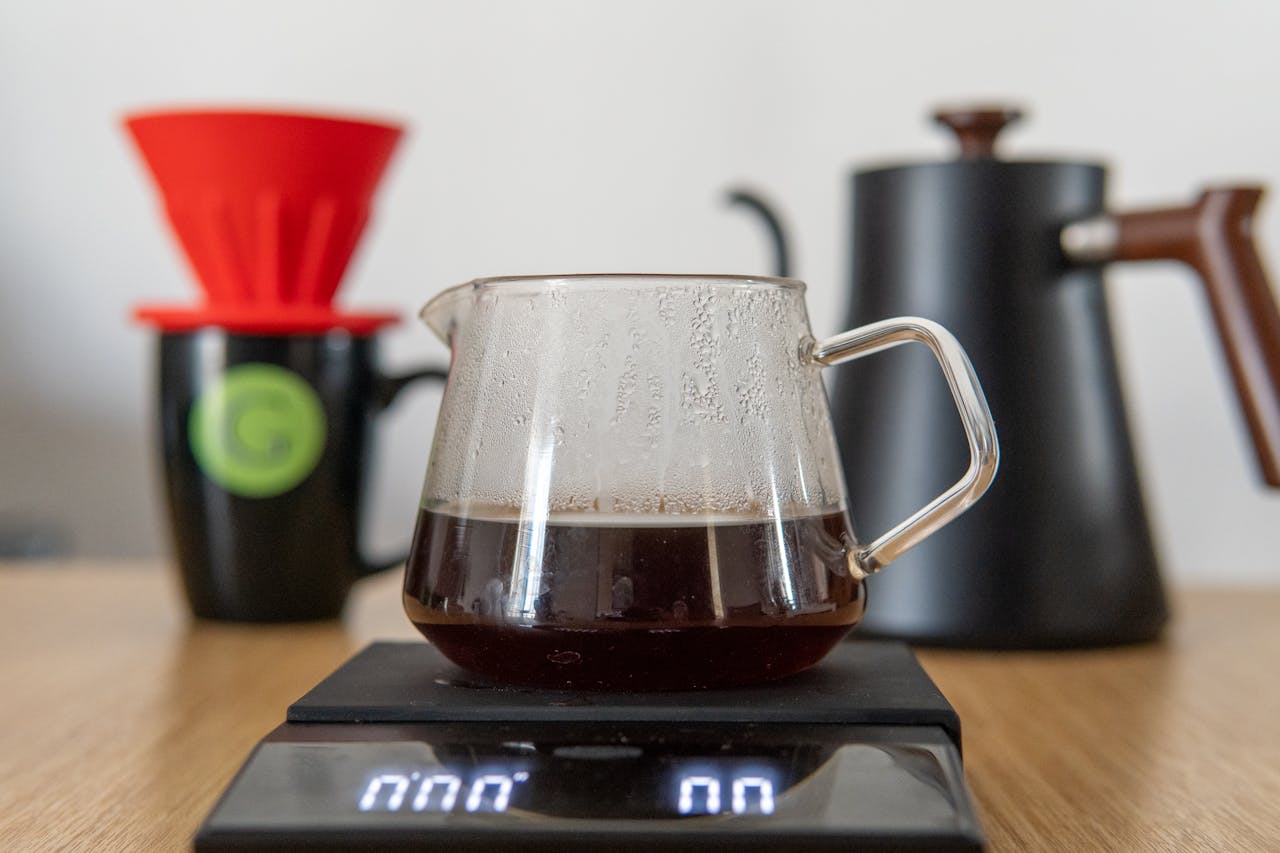
Use the Coffee Ratio Calculator (2 ways)
Use this coffee golden ratio calculator as a pour over coffee calculator, a french press coffee ratio calculator, or even a cold brew ratio calculator—the math stays the same; only the target ratio changes. Pick one starting ratio, then change only one knob per brew.
Water to coffee ratio equation
Water (g) = Coffee (g) × Ratio
Coffee (g) = Water (g) ÷ Ratio
Example: 12 fl oz water (~355 g) at 1:16 needs about 22.2 g coffee.
If you’ve been told there’s one correct coffee to water ratio forever, remember: taste wins. That’s why the “golden ratio coffee to water” idea is best treated as a starting point, not a rule. limits of “golden cup”
Espresso calculator note: people search “espresso to water ratio,” but espresso is usually measured as dose : yield. A classic is 1:2 (18 g in → ~36 g out). If you prefer a longer style, try ~1:2.5; for more intensity, closer to ~1:1.8.
Pick a Starter Ratio by Brew Method
Different brewers “like” different ratios because they extract differently. Use this as your coffee to water ratio chart (and yes—you can print it). Start with the ratio that matches your brewer, then adjust strength with ratio before you chase grind tweaks.
Filter methods (drip, pour-over, Chemex/V60)

If you want “normal” strength fast, these ranges are a solid starting point for the best coffee to water ratio by brewer. brew-method ratio ranges
| Brewer | Starter ratio | What it tends to taste like | Best next tweak |
|---|---|---|---|
| Drip / “filter coffee ratio” | 1:16 | Balanced, clear; good daily pot | Too weak → 1:15; too strong → 1:17 |
| Moccamaster | 1:16 | Clean, consistent batch cups | If bitter, coarsen grind before loosening ratio |
| Pour-over (V60) | 1:16 | Bright, layered; easy to adjust | If sour, go finer or extend time slightly |
| Chemex | 1:17 | Extra clean, lighter body | If too tea-like, move toward 1:16 |
| French press | 1:15 | Fuller body, heavier mouthfeel | If muddy, coarsen grind; if thin, tighten ratio |
| Percolator | 1:16 (start) | Bold, old-school; can over-extract | Use medium-coarse grind + gentler time/heat |
| Cold brew (ready-to-drink) | 1:12 | Smooth, mellow, lower bite | Want more punch → tighten toward 1:10 |
| Cold brew concentrate | 1:8 | Concentrate for diluting | For very strong concentrate, some go 1:9 coffee-heavy styles in practice—taste decides |
| Moka pot | 1:10 | Intense, bold stovetop cup | Lower heat to reduce bitterness |
| Instant coffee ratio | Start 1–2 tsp per 8 fl oz | Convenient; strength varies by brand | Increase by ½ tsp steps until it tastes right |
Want a standards-based reference point? The SCA golden cup standard language often centers around 55 g/L (roughly ~1:18), best treated as a guideline—not a rulebook. SCA 2017 ratio standard
Ratio controls strength. Grind, time, and temperature control extraction. Change one knob at a time and your coffee gets easier to “debug.”
Immersion methods (French press, cold brew)
Immersion brews can handle slightly tighter ratios because coffee stays in contact with water longer. If French press tastes bitter, try a coarser grind or a shorter steep before changing ratio. If it’s thin, tighten 1:16 → 1:15 and re-taste.
Concentrated methods (espresso, moka)
For concentrated brews, ratio often describes a more intense drink than standard drip. Espresso uses dose:yield; moka pot uses puck size and water chamber limits, so treat the “ratio” as a style guide, not a strict recipe. If it’s harsh, reduce heat and avoid aggressive boiling.
Convert Cups, Ounces, and Tablespoons Without Surprises
This is where most “my ratio didn’t work” stories start: cups aren’t always 8 ounces, scoops vary, and “a pot” can mean wildly different things. If you measure coffee by weight, your coffee to water ratio in grams stays true even when the container changes.
“Cup” reality check (6 oz vs 8 oz vs coffee maker lines)
Many drip machines mark a “cup” as 5–6 fl oz, while your kitchen cup is usually 8 fl oz. Those measurements on a coffee pot can trick you into brewing weak coffee. For a drip machine coffee maker ratio, pick total water first (grams or fl oz), then calculate coffee grams.
Scoop-to-grams (tablespoons and teaspoons)
Spoons are useful in a pinch, but they’re not precise. A coffee scoops to water ratio changes with grind size and how packed it is, so treat spoons as estimates and calibrate once with a scale. convert ratio to grams
Printable coffee ratio chart (common sizes)
| Brew size | Water | Coffee @ 1:16 | Use-case |
|---|---|---|---|
| 1 mug | 12 fl oz (~355 g) | 22.2 g | How to brew 1 cup (big mug) |
| 32 oz | 32 fl oz (~946 g) | 59.1 g | How much coffee for 32 oz of water |
| 12 coffee-maker cups | 60 fl oz (~1,774 g) | 110.9 g | “12 cups” on many carafes |
| 30 coffee-maker cups | 150 fl oz (~4,436 g) | 277.3 g | How much coffee for 30 cups |
| Cold brew concentrate | 64 fl oz water (~1,893 g) | 236.6 g @ 1:8 | How much coffee for 64 oz cold brew |
Quick answers (grams, cups, spoons)
- Grams of coffee per cup: for 8 fl oz at 1:16, start around 14 g.
- Grams of coffee per liter: at 1:16, start around 62.5 g per liter.
- How many grams per oz of water: at 1:16, about 1.85 g coffee per fl oz of water.
- Grams of coffee for pour over: 20 g coffee pairs well with ~320 g water at 1:16.
- How much coffee beans to grind per cup: weigh beans the same as grounds (by weight it’s effectively 1:1).
Spoons & scoops: A level tablespoon of medium-ground coffee is often roughly 5–7 g (varies). So 1 tablespoon of coffee in grams isn’t a single number, and 45 grams in tablespoons is roughly 6–9 tbsp depending on grind and how you scoop. For water-like liquids, 45 g is ~3 tbsp.
Brand note (no drama): For pre-ground coffee like Folgers or Cafe Bustelo, start with the same ratio and adjust tighter/looser to taste—pre-ground consistency is the main variable you can’t change. For a single serve coffee maker no pods (reusable basket), treat it like drip: start around 1:16 for a 10–12 oz cup.
| Conversion | Answer | Kitchen shortcut |
|---|---|---|
| 16.9 oz equals how many cups | ~2.11 US cups | Divide fl oz by 8 |
| 1500 ml to cup | ~6.34 US cups | 1 cup ≈ 237 mL |
| 35 grams to milliliters | ~35 mL (water-like) | For water, g ≈ mL |
| 2.5L to qt | ~2.64 quarts | 1 L ≈ 1.06 qt |
| 60 cc to cups | ~0.25 cups | About 1/4 cup |
| 34oz to qt | ~1.06 quarts | 32 oz = 1 qt |
| 25oz ml | ~739 mL | 1 fl oz ≈ 29.6 mL |
| 750 grams to cups | ~3.17 cups (water-like) | 750 mL ÷ 237 |
| how many 1/4 make 1 cup | 4 | Quarter-cups add fast |
| how many 1/3 cup make 1 cup | 3 | Three-thirds make a whole |
Dial It In: Stronger, Weaker, Bitter, Sour
Here’s the simple split: ratio fixes strength; grind/time/temp fix flavor problems. If you change everything at once, you can’t tell what helped. For the next brew, make one intentional change, then taste again.
Adjust ratio the clean way (one click stronger/weaker)
- Too weak: 1:16 → 1:15 (keep grind/time)
- Too strong: 1:16 → 1:17 (keep grind/time)
- Drip coffee ratio grams: weigh coffee; don’t trust “scoops”
- Best drip coffee ratio: start 1:16, then taste
- Best pour over coffee ratio: start 1:16, then adjust time/grind
- How to make a pot of coffee: set water → weigh coffee → brew → taste
Troubleshoot flavor (bitter vs sour vs thin)
If it tastes bitter / harsh…
- Grind: go a bit coarser
- Time: shorten contact time slightly
- Temp: lower temp a touch for dark roasts
If it tastes sour / sharp…
- Grind: go finer (small steps)
- Time: increase contact time a bit
- Pour: slow down; keep bed evenly wet
Coffee brew temperature chart (starter ranges)
| Roast | Temp range | Why it helps |
|---|---|---|
| Light/medium | 200–205°F | Supports clarity and sweetness |
| Dark | 195–200°F | Reduces harshness and bitterness |
Coffee grind chart + pour over timer
- Espresso: fine
- Pour-over (V60): medium-fine
- Drip / Moccamaster: medium
- Best coffee grind for percolator: medium-coarse
- French press / cold brew: coarse
- Pour over timer: aim ~2:30–3:30 for a single cup, then adjust
Best coffee pour over method (simple): rinse filter, bloom 30–45 seconds, pour steadily, and keep the bed evenly wet.
Advanced notes (when the ratio isn’t the problem)
If your results swing wildly, suspect inconsistent grind, channeling (espresso), or uneven pouring (pour-over). For cold brew makers like an OXO cold brew ratio search, the biggest variables are steep time and grind size—keep ratio steady, then adjust steeping before you chase new numbers.
Save Your Best Recipe (Printable Brew Log)
The fastest way to level up is to keep a tiny record of what you brewed and how it tasted. You don’t need a spreadsheet—just a template you can fill in while the kettle heats. Write down your best cup once, then brew it again on purpose.
Fill out the brew log (it’s editable)
Make it repeatable (your “house recipe”)
Once you find a cup you love, lock the recipe in three numbers: coffee grams, water grams, and ratio. Next time you switch beans, keep those steady and adjust grind to taste. Repeat first, tweak second.