If you’ve ever nailed a cup one day and couldn’t recreate it the next, you’re not alone. A coffee grinder with a scale (or a grinder paired with a scale) fixes the biggest problem in home brewing: guessing.
What if the “grinder with a built-in scale” isn’t the upgrade you think it is? For some people, dosing by weight is the easiest way to get repeatable espresso—set grams, grind, done. For others, it’s a finicky sensor bolted to a noisy appliance, and a simple external scale plus a better grinder wins every time. Let’s break down the tradeoffs, then pick the setup that actually improves your coffee.
TL;DR: If you’re shopping for a grind by weight coffee grinder (a GBW grinder—a grinder that weighs coffee as it dispenses), you’re really choosing a workflow: speed vs flexibility. Espresso drinkers usually benefit most from weighing dose and yield; filter drinkers often get more value from a better burr grinder plus a reliable separate scale. Built-in scale grinders can be convenient, but they’re pickier about counter stability, cleanup, and calibration.
- Buy for grind quality first: burr uniformity beats fancy modes.
- Use weight as your “fixed point”: change one variable at a time.
- Make it easy: a dosing cup, funnel, and simple notes beat guesswork.
What “coffee grinder with scale” really means
People use this phrase in two different ways: a grinder that includes a scale, or a grinder-and-scale pairing you build yourself. Both approaches can work, but they solve different problems. The right choice is the one that makes your daily routine simpler—not the one with the longest feature list.
Built-in scale vs. separate scale
Built-in scale grinders (often called grind-by-weight or GBW) aim to stop automatically when you hit a target dose. That can feel luxurious when it’s dialed in, especially if you make multiple drinks back-to-back.
A separate scale is the modular option: you can weigh beans before grinding, weigh your dose as you prep, and weigh brew output. It’s also easier to upgrade in pieces—swap the grinder later, keep the scale you like.
In shopping terms, people may say grinder with scale, burr grinder with scale, or a simple grinder and scale combo. The practical decision is the same: do you want one integrated device to speed up dosing, or a flexible pair of tools you can mix-and-match over time?
Where the scale helps most
Espresso: Dosing to 0.1 g keeps shot time and flavor swings under control.
Pour-over: Weighing beans and water makes your recipe repeatable—even when your pour isn’t perfect.
Cold brew: A stable ratio prevents “weak batch” surprises when you scale recipes up.
Meal prep: Pre-portion doses into jars once, then brew on autopilot all week.
Why weighing your dose beats “counting seconds”
Timed grinding sounds consistent, but grinders don’t dispense coffee at a perfectly steady rate. Beans change (freshness, roast level, density), static changes, and burrs warm up. So “grind for 10 seconds” might be 17 g today and 19 g tomorrow. Weight is the input you can actually repeat.
Dose, yield, and ratio in plain English
Think of your recipe as an equation: dose (dry coffee in) + water (in) = yield (coffee out). For filter coffee, you’ll often start around a 1:15 to 1:17 coffee-to-water ratio by weight; brew ratios explained is a quick reference for common starting points.
| Brew style | Easy starting dose | Simple target |
|---|---|---|
| Pour-over (single cup) | 20 g coffee | 320 g water (1:16) |
| French press | 30 g coffee | 450 g water (1:15) |
| Espresso | 18 g coffee | 36 g out (1:2 yield) |
Consistency makes troubleshooting faster
Here’s the practical payoff: once your dose is fixed, a “bad cup” becomes useful information. If it’s sour and thin, you’re likely under-extracting—go a touch finer or increase contact time. If it’s harsh and bitter, you’re likely over-extracting—go coarser or shorten contact time. With a consistent dose, you can connect your tweak to the result instead of guessing.
Mini example (espresso): You pull 18 g in / 36 g out in 22 seconds and it tastes sharp. Keep dose and yield the same, then grind a little finer until you land closer to your target time and the flavor rounds out. If you change dose and grind at once, you’ll never know what fixed it.
Mini example (pour-over): You like 20 g coffee to 320 g water, but today it tastes weak. Keep the same ratio and grind, then pour more slowly (or add a short bloom and a couple of gentle pulses). If it still tastes weak, increase dose to 21 g while keeping water proportional (336 g). Because everything is weighed, you can repeat the “good version” tomorrow instead of hoping you remember the pour.
Quick safety note: Keep your scale away from puddles, steam vents, and hot machine surfaces. If you brew next to a sink, use a towel “landing zone” so the scale never sits in splash range.
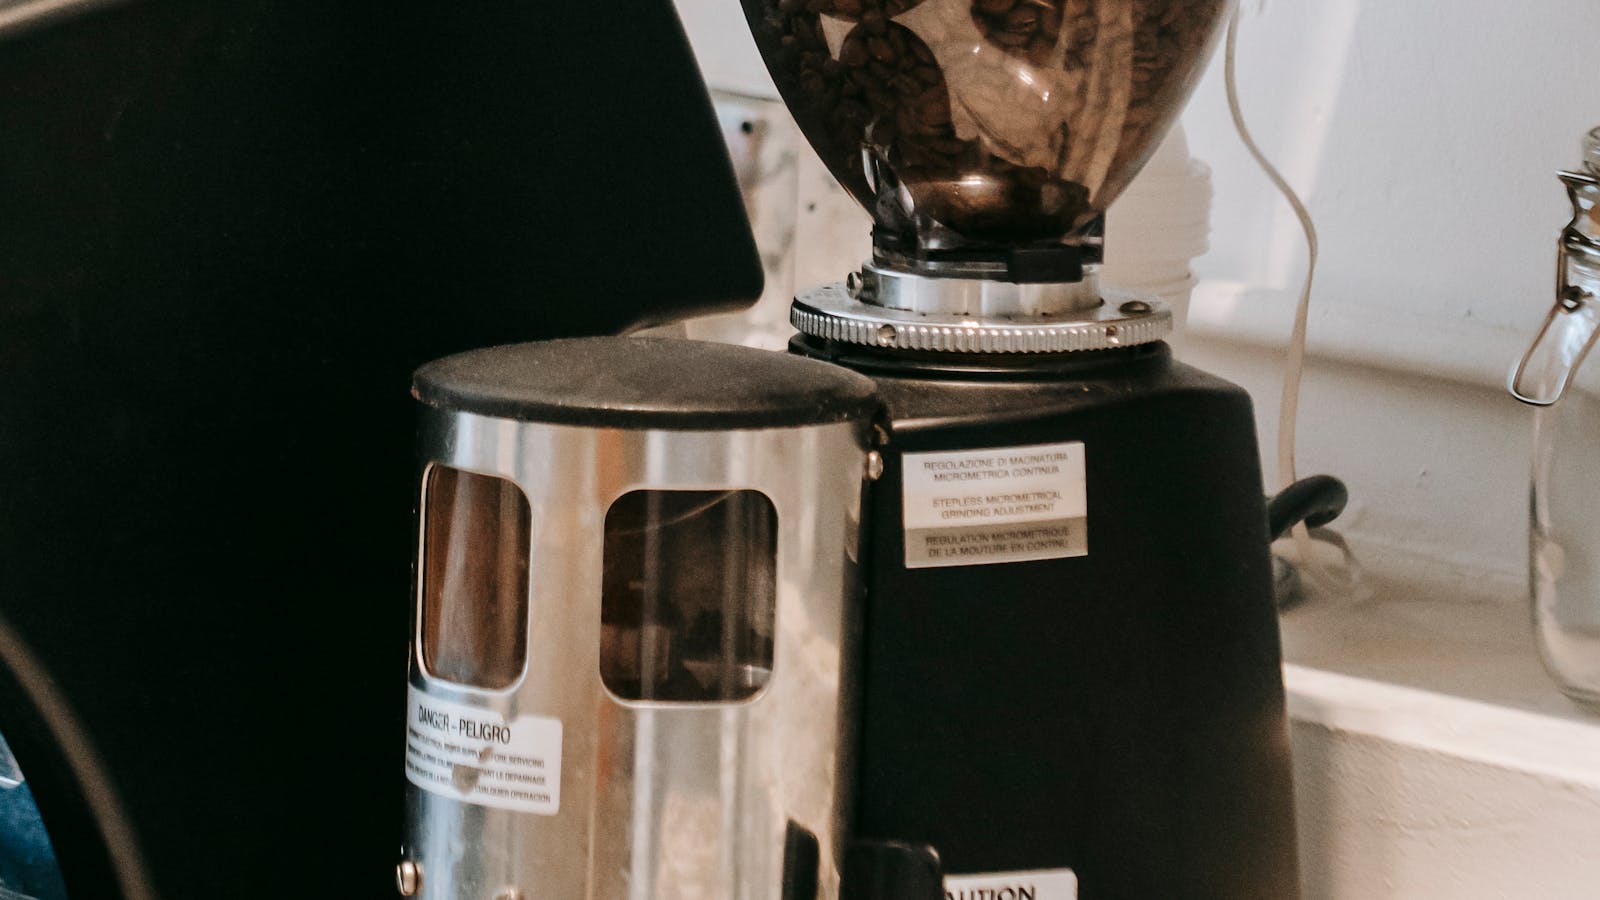
The grinder side: burrs, adjustment, and retention
A scale won’t rescue a grinder that produces a mix of boulders and dust. For repeatable coffee, you want a grinder that produces uniform particles and holds its setting reliably—then the scale keeps your input steady from brew to brew. Grind quality is the foundation; weighing is the amplifier.
Burr type and what it changes
Conical burrs are common in home grinders and can be forgiving across multiple brew methods. Flat burrs are often chosen for clarity and separation in filter coffee and for certain espresso styles, but they can be pricier and sometimes emphasize the importance of dialing in.
Also pay attention to how the grinder adjusts. Stepped grinders make it easy to return to a known setting (“my filter setting is 18”), while stepless grinders offer more precision for espresso but can be harder to “bookmark.” Either way, consistency comes from making small, repeatable moves—and keeping your burr carrier clean so the setting doesn’t feel different from one week to the next.
If you’re upgrading from a blade grinder, the “before and after” difference is dramatic—blade chopping creates uneven pieces that extract at different speeds. burr vs blade grinders explains why that unevenness shows up as both bitterness and sourness in the same cup.
Retention and why single dosing is popular
Retention is coffee that stays inside the grinder (burr chamber, chute, corners). It matters most when you’re dialing in espresso or switching beans: yesterday’s retained grounds can dilute today’s dose and make flavor feel “muddy.”
If you prefer a single dose grinder (a single dosing coffee grinder you load per brew), it’s easier to control retention and keep your notes “clean.” You don’t need perfection—just a repeatable routine: weigh beans, grind, then clear lingering grounds so less coffee sits inside waiting to surprise your next cup.
Simple maintenance rhythm: brush the chute weekly if you grind daily, and do a deeper clean (remove the top burr if your model allows) every month or two. If your “same recipe” suddenly tastes stale or your doses start to vary, a quick clean is one of the highest-return troubleshooting steps.
When your dose is consistent, your grind changes become meaningful—and dial-in stops feeling like roulette.
The scale side: sensitivity, speed, and workflow
The “right” coffee scale depends on how you brew. For espresso, you care about responsiveness and fine resolution. For pour-over, you care about stability and readability while you pour. The best scale is the one you never argue with—it just sits there, taring and reading without drama.
Specs that actually matter
Resolution: 0.1 g makes espresso dosing easier. Capacity: make sure it can handle your setup (server + dripper + water). Response: a laggy scale makes you “chase the number,” especially during pour-over.
If you’re shopping a grinder with a built-in scale, assume it will be more sensitive than a standalone scale. Vibration, a wobbly portafilter, or a dosing funnel touching the counter can cause jumpy readings. That doesn’t mean GBW is “bad”—it just means your setup has to be tidy and repeatable for the feature to feel like a benefit.
Common problems and easy fixes
| Problem | Likely cause | Fix |
|---|---|---|
| Reading drifts up or down | Unstable counter, vibration, or a warm surface | Move to a solid surface; avoid putting the scale on a squishy mat |
| Numbers jump during grinding | Portafilter/funnel touching the machine or counter | Make sure only the scale supports the weight; adjust forks or use a dosing cup |
| Slow to respond while pouring | Low refresh rate | Pour in small pulses; use a scale known for faster response if it annoys you |
| Overshoots your target dose | Momentum from the grinder + lingering grounds | Stop slightly early and “top off” with short bursts; keep a small spoon or brush nearby |
Espresso workflow example: Put your dosing cup or portafilter on the scale, tare to zero, then grind until you hit your target (say, 18.0 g). If you miss by 0.3 g, don’t panic—make a tiny adjustment and write it down. Any espresso bean coffee grinder can hit a number once; the goal is to hit it repeatedly without drama.
If you’re weighing directly into a portafilter, a small ring or funnel helps keep grounds from spilling. Spills don’t just make a mess—they also make your dose reading lie.

Pick your setup by brew method
The “best” grinder-with-scale combo depends on what you brew most. If you split time between espresso and filter, prioritize a grinder with a broad, repeatable adjustment range, then pick a scale that suits your most demanding method. Choose for your daily cup, not your occasional experiment.
Espresso priorities
Espresso is less forgiving. Small grind changes matter, and dose consistency matters even more. When people search for the best espresso grinder or the best grinder for espresso at home, what they’re really chasing is repeatability: stable adjustments, predictable dosing, and a workflow you can do half-awake.
The best grinder for espresso beans is the one that lets you dial in precisely and then stay there—without drifting, clogging, or overshooting your dose by a full gram. If the grinder makes it easy to weigh dose and weigh shot output, your “good shot” becomes a repeatable target instead of a lucky day.
Filter and immersion priorities
For pour-over, you’ll care about a stable platform and a display you can read while pouring. For immersion (French press), response speed matters less, but weighing still matters because it keeps your strength consistent when you change batch size.
- Espresso focus: fine adjustments, stable forks/cup, and low-fuss cleanup.
- Shared tip: keep a small brush and dosing cup nearby for quick corrections.
- Dial-in habit: change one thing at a time—usually grind first.
- Filter focus: quiet grinding, less static mess, and a wide, stable scale platform.
- Recipe habit: weigh beans first, then water; log the ratio you liked.
- Starting point: a grind size chart can get you “in the neighborhood” before you fine-tune.
Budget sanity check: If your budget is tight, don’t pay extra for “smart” features while settling for a weaker grinder. A stronger burr grinder plus a simple scale often tastes better than a feature-packed grinder that struggles with uniformity.
Entry lane: Put budget into a competent burr grinder, add a simple scale, and get consistent with one recipe.
Middle lane: Prioritize an espresso-capable grinder with stable adjustments, then pair it with a fast 0.1 g scale.
Premium lane: If you value speed and repeatability for multiple drinks, a well-tuned grind-by-weight grinder can be a genuine quality-of-life upgrade.
The 10-minute setup and calibration routine
Once you’ve got a grinder and scale, the fastest way to improve is to set a baseline and keep notes for a week. You’re not building a spreadsheet empire—you’re removing guesswork. Measure first, then adjust with intent.
First-time setup checklist
- Placement: Put the scale on a stable surface; avoid wobble.
- Warm-up: Run the grinder briefly so conditions match real use.
- Baseline dose: Pick one dose for the week (18 g espresso or 20 g filter).
- Starting grind: Use the suggested mark, then adjust in small steps.
- Tare habit: Tare the empty cup/portafilter every single time.
- Note template: Dose, grind setting, time, and taste in one line.
Quick verification: If something feels “off,” tare your scale, add a known amount of water (for example, 100 g), and make sure it reads steadily without drifting. If the number wanders, the problem is usually the surface, vibration, or heat—not your coffee.
If static is making your dose inconsistent, try reducing it at the source: keep your grinder and cup clean, and (if you’re single dosing) add a tiny drop of water to the beans before grinding to cut cling. The goal is less mess and less “lost coffee,” not turning your routine into a science project.
The dial-in loop that actually works
Step 1: Lock your dose (by weight). Step 2: Brew and time it. Step 3: Taste and choose one adjustment. Repeat until you’re in the flavor zone you like.
There’s no single best coffee grind for espresso—the “best” is the grind that gives your target yield in your target time with balanced flavor for your beans and machine. Start with small grind changes, keep your dose steady, and let taste confirm the direction.
When you’re learning, aim for “repeatable enough” instead of perfection. If your target is 18.0 g and you land at 18.2 g, don’t throw the whole shot away—brew it, taste it, and learn what that change did. Over time you’ll figure out whether your grinder tends to overshoot, and you’ll naturally stop a beat earlier.
If you’re single dosing, a simple routine—measure beans, grind, then clear lingering grounds—can make results more predictable day to day. single dosing basics explains why it’s popular when you switch beans or chase consistency.
Advanced notes: the “tiny changes” rule
Espresso: Change grind first, then yield (shot weight), then dose—one at a time. If you change two variables at once, you won’t know which one helped.
Filter: Keep ratio steady for a few brews. If the cup is weak, adjust ratio slightly (more coffee) before chasing grind. If the cup is hollow or overly bitter, adjust grind and pour technique before changing ratio.
Printable dose & recipe planner
This simple planner keeps your “inputs” visible so you stop re-learning the same lesson. Use it for espresso or filter: write your dose, your grind setting, what you changed, and how it tasted. After 5–10 brews, patterns show up fast. Good notes turn one great cup into a repeatable routine.
How to read your own notes: If two brews used the same dose and water but tasted different, look for the hidden variables—grind setting drift, retention (old grounds mixing in), or a scale that wasn’t fully tared. If three “good” rows cluster around one grind setting, that’s your baseline; when beans age, you adjust around that point instead of starting over.
Once you’ve picked your combo, the fastest improvement you can make is simple: keep your dose and water weights stable for a week, and only change grind in tiny steps. That’s the “boring” path that makes your coffee reliably great.