.jpg)
A moka pot (including the classic Bialetti Moka Express) is a stovetop brewer that makes a concentrated, espresso-like drink—think espresso for moka pot, not drip coffee—so your beans and grind matter more than usual.
If your moka pot tastes bitter, are you sure it’s the pot’s fault—or is it the coffee you’re feeding it? Moka brewing concentrates flavors fast, which means dark, smoky roasts (or overly fine pre-ground “espresso” coffee) can go from bold to harsh in a hurry. Choose a coffee that’s built for balance—medium to medium-dark, fresh enough to smell alive—and pair it with a medium-fine grind and gentle heat. The payoff is a richer cup with less burn and more sweetness.
TL;DR you can use today
- Roast: Start with medium-dark for body and sweetness (less “burnt”).
- Blend: Espresso blends (often some robusta) = thicker crema-like foam and punch.
- Grind: Medium-fine—gritty like table salt, not powdery.
- Shortcut: If it’s harsh, reduce heat and stop earlier before you change beans.
- Heat: Low-to-medium; treat sputtering as the “stop sign.”
- Basket: Fill level, don’t tamp, level the top with a light shake.
- Shopping: Look for “moka” or “stovetop” grind if you’re buying pre-ground.
- Repeatability: Change one thing per batch so your tweaks actually teach you.
What “best coffee” means in a moka pot
“Best” depends on how you drink it. Moka pot coffee is concentrated and bold, but it’s not a pump-driven espresso machine. Translation: it rewards coffees that stay sweet under intensity—and punishes anything that turns ashy, smoky, or overly extracted. The “best coffee for moka pot” is the one that tastes rich at moka strength and still tastes good when you dilute or add milk.
Wondering what coffee to use in moka pot brewers like the Moka Express? Start with medium to medium-dark espresso blends and a medium-fine grind. And what type of coffee does moka pot make—or can you make regular coffee in a moka pot? It makes a concentrated cup (often called moka espresso coffee), and you can turn it into a longer “regular” mug by diluting with hot water after brewing.
What to seek
- Body: “Chocolate,” “nutty,” “caramel,” “syrupy.”
- Balance: Medium to medium-dark roasts; low “smoke” language.
- Structure: Blends that taste complete without extra sweetness.
What to avoid (at first)
- Ash/smoke: Very dark “char” profiles that go bitter fast.
- Powder-fine grinds: Can choke extraction and taste burnt.
- Ultra-bright roasts: Light single origins can be great, but they’re less forgiving.
Think of it like seasoning. If you like your moka coffee straight, your coffee choice needs to be naturally mellow. If you mostly drink it with milk, you want a coffee with enough backbone to still be present after dairy and sugar.
One quick expectation reset helps a lot: Moka Express coffee should taste bold and aromatic, but it shouldn’t taste like burnt toast. If it does, assume “overheating or over-brewing” first. Beans matter, but technique can rescue a good bag that’s being brewed too aggressively.
Roast and blend choices that stay smooth
Moka extraction happens quickly and at higher temperatures than many drip methods. That combo tends to emphasize roast flavors (good or bad). If you’re not sure what to buy, medium-dark is the safest “sweet spot” for moka.
For many people, the best Italian coffee for moka pot brewing is a medium-dark espresso blend designed for a classic, chocolate-forward profile—an “Italian moka espresso” style cup that stays bold without turning ashy.
Choose your roast level
Use roast as your first filter. It’s not about “better beans”—it’s about what tastes good when concentrated. If a bag’s tasting notes lean “cocoa, caramel, nuts,” it usually behaves nicely in moka. If it leans “smoke, char, campfire,” you’ll need extra-careful heat control to avoid bitterness.
Arabica vs robusta (and why blends often win)
In moka, blends are popular for a reason: they’re built for consistency. Many espresso blends include some robusta, which can add a heavier mouthfeel and a more persistent crema-like foam. If you’re sensitive to bitterness, prioritize high-arabica blends or blends described as “smooth” and “sweet” rather than “intense” and “smoky.”
A practical way to choose: if you want a punchy, milk-friendly cup, an espresso blend (sometimes with a little robusta) is a strong first buy. If you want sweetness and lower edge when drinking black, a mostly-arabica medium-dark blend is usually easier to live with day after day.
Decoding “espresso roast” labels
“Espresso roast” usually means the roaster expects you to brew a concentrated drink. That’s useful for moka—but it doesn’t guarantee the grind is right (or that it won’t roast bitter). Here’s the key distinction: espresso roast is about flavor development, while espresso grind can be too fine for moka unless it’s specifically labeled for stovetop.
Quick caution: if a pre-ground bag says “extra fine,” treat it as a risk. Start with lower heat and stop earlier, or choose a moka/stovetop-labeled grind to avoid harshness.
Grind size and freshness (the make-or-break pair)
The moka pot has a narrow “happy zone” for grind: too fine and you’ll get harshness (and sometimes a stalled brew); too coarse and the cup can taste thin and sour. The best grind for moka pot coffee is usually medium-fine—fine enough for body, coarse enough to avoid burnt flavors.
What “medium-fine” looks like (without obsessing)
A classic reference point from Bialetti is “medium-fine” grind—closer to table salt than flour—so water can pass through evenly without choking the basket (Bialetti grind guidance).
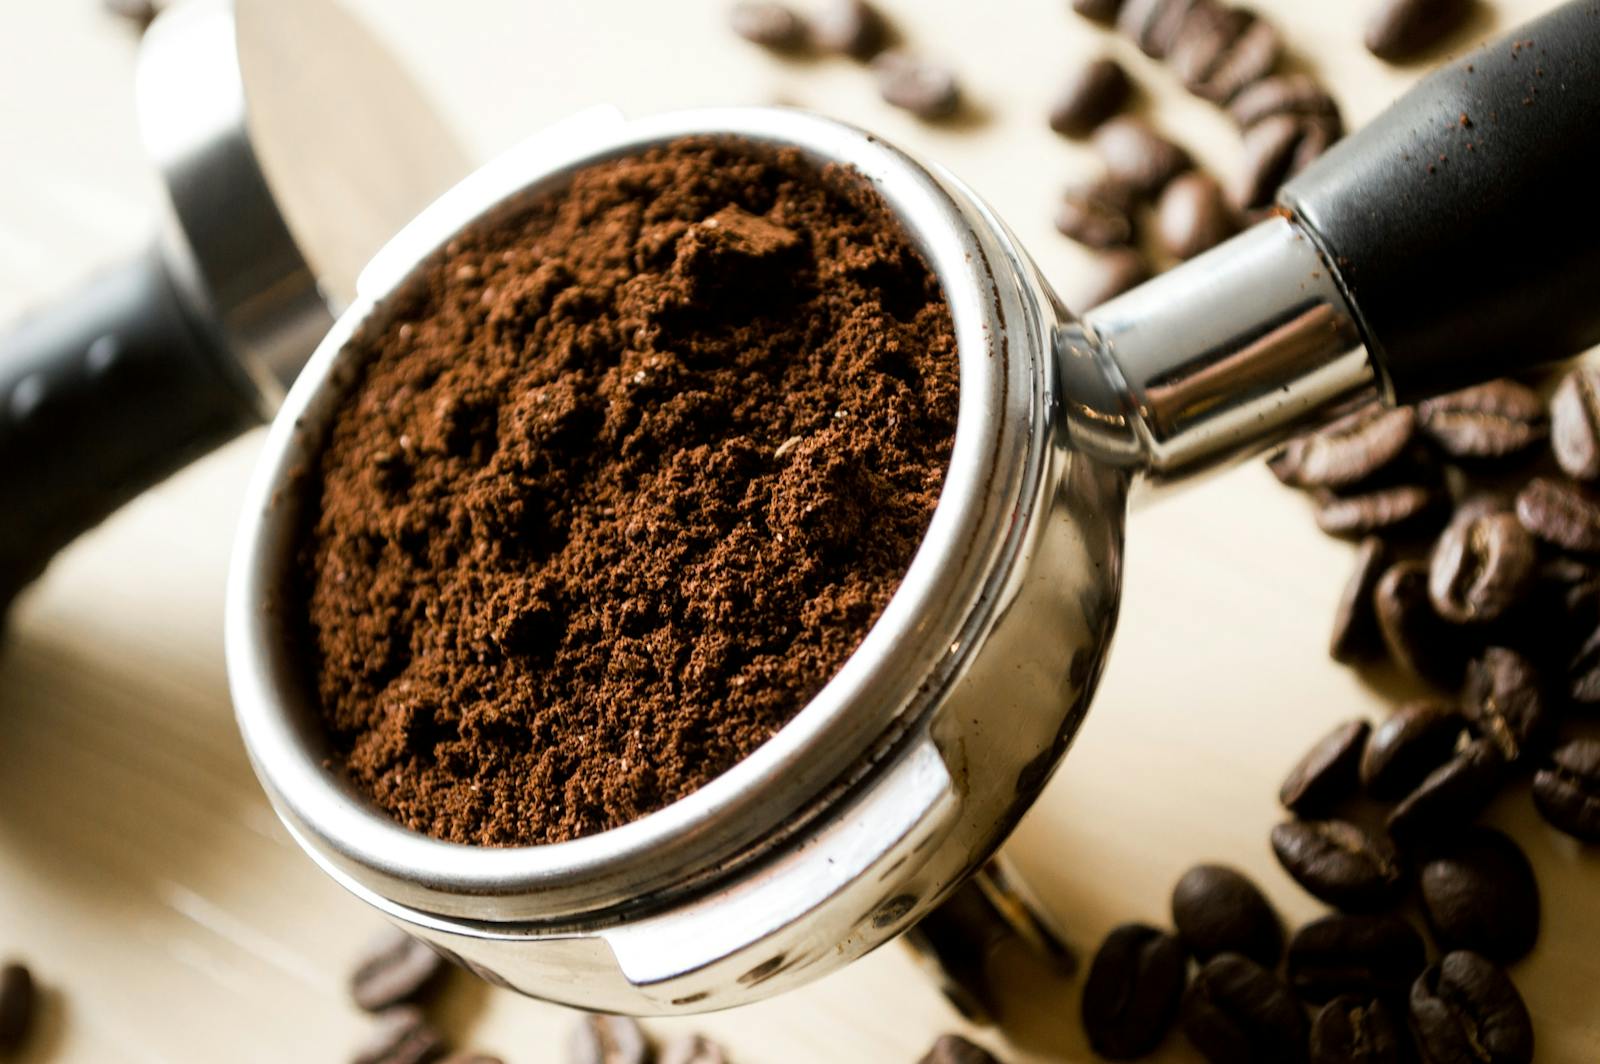
Quick visual test: pinch a bit of coffee between your fingers. If it clumps like dust and leaves a thick film, it’s probably too fine. If it feels like sand and won’t hold shape at all, it may be too coarse. You’re looking for a texture that lightly clumps and breaks apart—gritty, not fluffy.
Pre-ground vs. whole bean: if you can grind at home, you’ll dial in faster and keep flavors brighter longer. If you buy pre-ground, choose something labeled for moka or stovetop, and store it airtight away from heat and light.
Rule of thumb: when moka tastes bitter, adjust heat and stop point before chasing tiny grind changes.
— A calmer path to better cups
Freshness rules that actually matter
Freshness is real—but it’s not a contest. You don’t need beans roasted yesterday. What matters is that the coffee still smells lively and tastes sweet. If the bag smells flat or papery, moka will expose it. For pre-ground coffee, buy smaller quantities more often; for whole bean, keep it sealed and use it within a few weeks of opening for best flavor.
A simple dial-in loop: if the cup is harsh, lower heat and stop earlier first. If it’s still harsh, go slightly coarser. If the cup is thin, keep heat gentle but extend the steady flow a touch, then consider a slightly finer coffee grind for moka pot brewing. This order prevents you from “fixing” bitterness by making coffee watery.
Go slightly finer when…
- Weak cup: tastes like “strong drip,” not concentrated.
- Fast brew: coffee starts rushing early and finishes quickly.
- Hollow finish: aroma is nice, but the sip feels thin.
Go slightly coarser when…
- Harsh bite: bitterness dominates even with low heat.
- Stalling: little output for a long time, then sputtering.
- Muddy mouthfeel: heavy, gritty, or “overcooked” taste.
The short list: best coffee styles to buy (with examples)
Instead of chasing a single “best brand,” shop by style. That keeps your results consistent even when your grocery store rotates stock. Pick the style that matches your drink habit first—then choose a fresh, well-reviewed bag in that lane.
If you want a quick “buying checklist” to take with you, Homegrounds summarizes common moka-friendly traits (roast direction, grind targets, and what to avoid) in a way that’s easy to scan while shopping (moka coffee buying guide).
Buy by your goal
- Smooth black cup: medium-dark “sweet” blend; cocoa/caramel notes.
- Milk drinks: espresso blend with sturdy roast flavor (but not ashy).
- Bright + lively: medium roast single origin; keep heat gentler.
Buy by your constraint
- No grinder: moka/stovetop-labeled pre-ground; buy smaller bags.
- Inconsistent stove: forgiving blend; stop early to avoid bitterness.
- Rushed mornings: choose one coffee and tweak heat—not beans.
Best pre-ground coffee for moka pot (most convenient)
This is the “weekday win.” When you’re buying ground coffee for moka pot brewing, look for tins or bags labeled for moka, stovetop, or espresso—then confirm the grind isn’t powder-fine. As proof this category is real, some brands explicitly sell moka-ground coffee formats meant for stovetop brewing (illy moka-ground coffee).
If you’re specifically comparing brands: Lavazza coffee for moka pot fans usually do best with their espresso-style blends in a moka-friendly grind, while Starbucks coffee for moka pot drinkers often reach for Espresso Roast—just keep heat gentle and stop early if roast flavors get sharp.
- Best for: consistent mornings, small kitchens, no grinder.
- Choose when: you’d rather tweak heat/stop point than grind.
- Skip when: the bag says “extra fine” or “Turkish” grind.
Espresso-style shopping note: people often search for the best ground espresso for moka pot, but “espresso” on the label can mean roast style, grind style, or both. For moka, prioritize a moka/stovetop grind first, then roast level.
Best coffee beans for moka pot (best all-around control)
If you own a burr grinder, this is the most flexible route. For most kitchens, the best coffee beans for moka pot are espresso blends you can grind to medium-fine at home—often also the best espresso beans for moka pot if you like a classic, concentrated cup.
- Best for: cappuccinos/lattes, iced moka drinks, sugar-forward cups.
- Look for: “cocoa,” “toffee,” “hazelnut,” “balanced,” “crema.”
- Nice bonus: blends forgive small grind mistakes.
Medium-roast single origins (bright, but rewarding)
Single origins can be gorgeous in moka—especially if you like fruit, florals, or sparkling acidity. The tradeoff: they’re less forgiving. Keep heat gentler, stop earlier, and consider diluting with hot water to open up flavors rather than pushing extraction harder.
A simple decision shortcut: If you mostly drink moka black, try medium to medium-dark with tasting notes that sound like dessert. If you mostly drink it with milk, go a touch darker or choose an espresso blend so the coffee still “speaks” after dairy.
Match the coffee to how you drink it
“Best coffee” changes depending on whether you’re sipping straight from a demitasse or building a milky café drink. Choose coffee for the final cup, not the brewing method alone.
If you like a longer cup, don’t force the moka pot to do it by brewing longer (that’s where bitterness creeps in). Instead, brew normally, then dilute in the cup. A simple starting point is roughly 1:1 (equal parts moka coffee and hot water), then adjust to taste.
Drink it black
- Profile: medium-dark “sweet” blends or chocolate-forward single origins.
- Grind: slightly coarser if you taste bite.
- Serve: stir the top chamber before pouring to even it out.
Add milk (latte/cappuccino)
- Profile: espresso blends; medium-dark to dark (but not ashy).
- Grind: slightly finer if milk washes it out.
- Serve: warm milk, not boiling—sweetness stays intact.
“Americano-style” (diluted)
- Profile: medium roast or balanced blend—dilution reveals flaws fast.
- Method: add hot water to the cup first, then pour moka on top.
- Taste: aim for sweet + clean, not “extra dark.”
Iced moka drinks
- Profile: espresso blends or medium-dark with caramel notes.
- Method: pour over a little ice, then top with cold milk/water.
- Tip: brew slightly stronger than usual; ice will dilute.
Brew tweaks that protect flavor (and make “best coffee” taste best)
Moka pots have a reputation for bitterness mostly because they’re easy to overheat. The good news: you can fix most of that with a calmer brew routine. Your two biggest levers are heat level and when you stop the brew.
Start with a forgiving baseline
A widely shared approach for a 6-cup moka pot is to fill water to the safety valve, use about 25 grams of coffee, and avoid tamping—then keep heat low so you don’t scorch the extraction (Epicurious moka pot method).
If you don’t have a scale, you can still be consistent: fill the basket level, lightly tap the sides to settle grounds, and smooth the top with a finger. The goal is even resistance—not compression. If you want to measure later, start weighing your “level basket” once and use that number as your repeatable dose.
Control heat and stop early
Use low-to-medium heat and treat the first signs of loud sputtering as your cue to stop. When you let the pot gurgle aggressively, you’re pushing hotter steam through the coffee—often the moment bitterness spikes. If your stove runs hot, slide the pot halfway off the burner once flow begins.
A tiny “pro move” that costs nothing: once the coffee stream turns pale or starts spitting, run the bottom chamber under cool tap water for a few seconds. That slows extraction fast, protecting sweetness. Then stir the coffee in the top chamber before pouring so the first and last parts taste the same.
Upgrade without new gear
Most moka improvements come from a tight routine. If you want one upgrade, make it a burr grinder—because it helps grind consistency, which makes every other tweak more predictable. Everything else (like special filters or fancy water) is optional until your baseline cup tastes clean and sweet.
- Routine (6 steps): fill to valve • level basket (no tamp) • assemble firmly • low heat • stop before sputter • stir and pour.
Printable Moka Pot Dial-In Worksheet (click a cell to type • change one variable per row • print-friendly)
A fast “anti-bitter” mantra: don’t tamp • don’t blast the heat • don’t let it sputter for long.
Common mistakes and quick fixes
When moka goes wrong, it usually fails in predictable ways. This table lets you diagnose the flavor first—then make one change at a time. If you change three things at once, you’ll never know what actually fixed it.
Reset protocol (when you’re stuck): keep your coffee the same for three brews, set heat low, stop before sputter, and only then adjust grind in small steps. That sequence removes the biggest bitterness causes before you blame the beans.
Terminology + other brewers (quick clarity)
Moka names: in some regions you’ll see the moka pot described as a “greca” (and people will search for the best greca coffee maker) or even a “Spanish coffee pot.” This guide focuses on what to brew in it, not the best moka pot or the best stove coffee maker to buy.
Different brewer, different “best”: searches like “best coffee for percolator,” “best ground coffee for drip coffee maker,” or “best coffee for cafetiere” usually point to different grind sizes and roast choices than moka. Moka is medium-fine and concentrated; drip and cafetiere generally go coarser; percolators can favor sturdy roasts and careful grind to avoid bitterness.
One common mix-up: a moka pot isn’t a “mocha coffee machine.” Mocha usually means coffee with chocolate, while moka refers to the stovetop brewer style.
Advanced notes (when you’re ready)
Keep the basket dry: water droplets in the grounds can create early channeling. Wipe the rim and basket before assembling.
Clean the top chamber: coffee oils build up and can make even good beans taste stale. A simple rinse after each use and a deeper clean now and then helps more than people expect.
Don’t chase “crema” too hard: moka foam isn’t espresso crema. Focus on sweetness and balance first; the look will follow.
Safety note: never cover or remove the safety valve, and don’t brew with a damaged gasket or clogged filter—pressure needs a clear path.